 Colin's Beauford Project
Making Progress
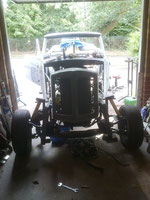
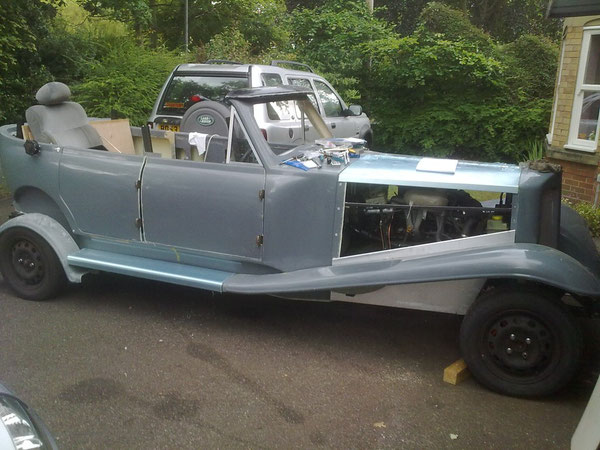
I started by dismantling the donor car and assembling the kit on the drive, close to the footpath. It was funny, but people walked past all the time, looking, but carrying on by. Then I fitted the radiator! It made the kit look more like a car, somehow it made a difference, everyone seems to say 'hello' and stop for a chat. I'm meeting some of my neighbours for the first time.
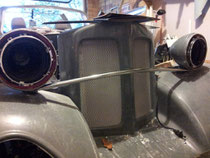
The radiator is turned on its side and mounted in front of the cross piece, effectively inside the Beauford nose. The original mounting brackets are cut off and I had to fabricate some more. I've cut the original fan cowling in half and I'll see how it runs with only one fan.
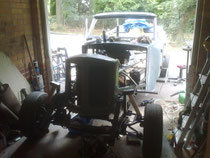
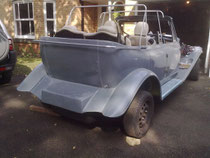
Having assembled the front & rear axles and the engine, it made some space in the garage. So after a couple of days tidying up and re-arranging I managed to get the Beauford away. It's a close thing though, it's a big car! The four door, long bodied version is 15' 7", while my garage is 15' 10" so it doesn't leave a lot of room spare. At the moment it doesn't have the wings on, or the bumpers so it gives a little space to work and move around. I haven't ordered the luggage rack, I'll see how much room is left when I've finished!
The gearstick was a challenge. Being an automatic I thought it might be easier, but as usual I was mistaken. I measured where it needed to be and cut out a hole in the transmission tunnel. A normal gearstick/box would have been fine, but the automatic has a lever which connects to the selector rod along the outside of the gearbox. The lever was too high fouling the tunnel side. After giving it some thought, I needed to lower it down so it cleared the side and the box, some cutting of the tunnel ensued. In effect I rebated the shift mechanism by about an inch.
The next thing was the front fibre glass floorwell. It needed a cut out for the steering column then trimming to fit. After about 2 hours of trialing, marking and cutting, marking and cutting, marking and cutting it almost fits, some more needed, but I got fed up and I'm inclined to get impatient and cut too much so I stopped (for now). I temporarily fitted the dash to see how much room there was behind with the heater and wipers.
I was determined not to get filthy today, so I fitted the mesh to the radiator shell, and continued with the shell itself. Then the top bonnet panels, it all went relatively smoothly. The only hitch was the drill bit breaking and the drill landing on my thumb. Fortunately, the bit broke cleanly, flush with the chuck, so didn't drill a hole in my thumb, just gave me a throbbing blood blister. I'll remember to keep it clear next time, but I know that's what I thought last time. I must get the other panels and shocks from Beauford.
Prop-shaft bearing mounting. The manual tells you mount the bracket across a particular chassis member, mine did not line up so I couldn't fix it. I contacted Beauford, Dave said there was so much variation in the models he wasn't surprised, he gave me a piece of angle iron to move the mounting point back along the chassis. Job done!


I've been working on the power steering, where to mount the reservoir make the connections etc. On the Sierra the power steering is mounted on the front beam, along with the engine, axles etc., but on the Beauford the beam is set further forward than the engine by about 18" so the pipes needed to be redirected. The high pressure feed from the pump was turned through 90 degrees and still connected the pump to power steering. I mounted the reservoir on the chassis rail just behind the radiator mid-way between the pump and rack. I extended the low pressure feed to the pump and return pipe from the rack (fortunately I had a Landrover Discovery power steering pipe which I used).
I've fitted the rear seat belt posts, it was fairly straight forward. They look ugly but I suppose they're functional, the same with the front posts, I need to think about how to cover them and make them acceptable for IVA.
The brake pipes I made up a while ago and put them in place, I finally secured them to the chassis. The chassis is 3mm gauge box section and sometimes drilling at an angle it took its toll, it took three drill bits. I was holding the pipe out of the way with my knee, I didn't want to catch it with the chuck, when the bit broke and you've guessed went into the pipe. Fortunately I'd left some slack in the pipe, I was going to have to shorten it anyway. So I cut the damaged bit out flared male and female unions on to the ends and joined it up. The rest of the clips went on without too much trouble. I've pop riveted them because don't intend change them and I couldn't get a`self tapping screw in anyway.
The seats have been on my mind for some time. The sierra drivers seat was worn through, dirty and generally tired out, but it was very comfortable. I considered having them recovered in leather, but the cost put it out of reach, so the search began for an alternative. My wife has got a Ka and the back seat would fit in the Beauford with no problems, the front seat was slightly narrower than the sierra's so it seemed like a good solution. A trawl through ebay showed quite a few possibilities, with leather seats going for under £150. I set my self a`limit of £100 and just missed one set of seats because the signal dropped out on my phone with 15 seconds to go, they went for £98. I nearly threw my phone across the restaurant! I was resigning myself to having to make do with standard cloth seats and put a 0.99p opening bid in for a set, when a set of cream leather Ka seats came up! The auctions were both ending within 25 minutes of each other. There wasn't much interest in either set, which was good news for me, I won both, 0.99p for the cloth and £70 for the leather. I paid for the cloth set and told the seller to put them up for auction again because I wouldn't be collecting. The leather seats were relatively local so I collected them the next day. They need a good clean and the drivers seat needs a bit of nourishing but they look superb, I've just got to store them until I'm ready to fit them.
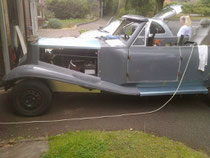
The front wings have been fitted temporarily and I can still get it in the garage! Its starting to take shape.
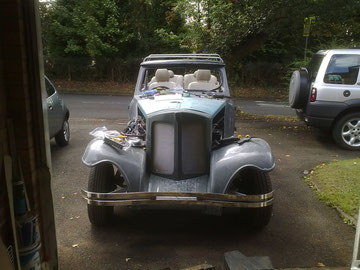
I painted the front bumper brackets with silver hammerite and fitted them. Then fitted the front bumper and cut the front panel to fit.
The Ka cream leather seats look good, not secured yet.
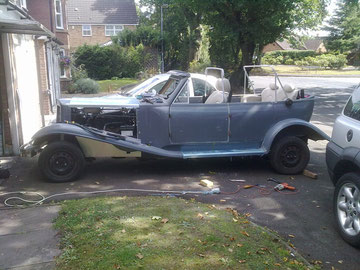
The rear wings have been fitted temporarily (they've got to come for painting and to fit the wing piping) along with the running boards. With the front bumper and rear wings I was concerned about getting it in the garage, but I can still get it in, just!
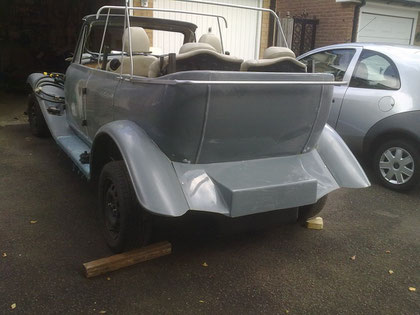
I don't think I'll be able to fit a luggage rack and trunk, because there's only a couple more inches I can get, by moving the garage around. Short of knocking it through to the kitchen! The rear bumpers fit to the luggage rack though and I feel the petrol tank is a little vulnerable so I'll have to think about it
I've been working on the rear seats making a bracket to enable me to fold them down utilising the limited space behind them. Front seat belt brackets adapted and fitted to the Ka seats, brackets fabricated to secure the seats. Spreader plate made of 8mm steel plate to secure them to the chassis. Windscreen pillars filled with U-Pol, smoothed down and dashboard gaps filled either side.


Headlight shells fitted, rear lights fitted, it's starting to look like a real car now.
It is quite interesting meeting new people. Everytime I get the car out of the garage to work on it someone stops to have a look and ask what it is. The kids going to the local primary school are the best, they don't lower their voices and I get plenty of "Wows!", they're convinced it's Chitty Chitty Bang Bang and I'm sure they think I'm Caractacus Potts, I don't doubt I'm a bit potty.
Anyway, back to progress. I've fitted the plywood floor, it was straight forward. The fibre glass front floor well was a challenge though. I had already trimmed it months ago, but it needed a final fit to both width and the transmission tunnel. I drilled a hole for one of the rivets (using smaller than the final one needed) and put a small rivet in place. Having got it so it wasn't going to move about, I drilled the rest of the holes the correct size, then drilling out the first rivet to size. Then putting mastic all around I riveted the floor well in place. Then drilled and put the final bolts through the plywood and chassis, it's in and not coming out again!
I collected the windscreens, bonnet side panels, fuel sender unit and front shocks form Beauford. It's always a pleasure to go to the factory and chat to the guys there and look at the cars, it sorts a few build issues out in my mind - I now know how to fit the fibre glass door pillars!
To fit the fuel sender unit I had to first file the aperture a couple of mil' wider, then mark and drill the tank for the self tapping bolts to secure it. I had to adjust the float arm length on the fuel sender as per directions. I vacuumed the swarf and dust out of the tank, then fitted the sender unit. I can now fit the rear floor panel, another day!
Next was to fit the front shocks. It's nice to see the car without the pieces of wood jammed in the space. It sits slightly higher now, the only trouble is, it accentuates the fact that the wheels are slightly out of proportion on the car. They could do with being at least 20", but that's not a realisitic proposition, without changing the diff etc.
It's nice that people are fascinated by the car, but there are times when I feel like putting a sign up saying "It's a kit car, a called Beauford. Yes, I know it looks authentic, Yes, I hope it will look great when it's finished too and please leave me alone to get on with it." The novelty is wearing a little thin after the fourth person has stopped to have a look and a chat. I'm an anti-social pig what can I say!
When I went to the factory I asked about the door pillars, because I couldn't work out how to fit them. I was trying to fit them on the inside to cover the steel work, when you find out they're meant to go on the outside, between the doors, covering the hinges it all makes sense. So I spent two days working on them and cutting the edge of the doors to fit.
I fabricated a badge bar out of chromed 22mm copper tubing and fitted it between the headlights. It braces the headlights and also looks good, even though I say so myself.
The bodywork at first glance looks good, but when you look closer there are a lot of blemishes and moulding burrs. I've got a lot of preparation to do, sanding and filling and sanding etc. I've also got to decide what colour to paint it and what paint to use. I'll probably hand paint it because the garage is too small to work with the door closed.