 Colin's Beauford Project
Problems I've Come Across
ABS - The donor car was fitted with ABS. All the sensors were corroded and would cost £160 a wheel to replace. On talking to the guys at Beauford, they advised me not transfer it to the kit. Apart from being expensive they said other clients had had problems with getting the ABS through IVA. It almost decided me to do the opposite because I love a challenge, but in the end I decided to benefit from someone else’s experience. A period car wouldn't have had it, so that's my excuse!
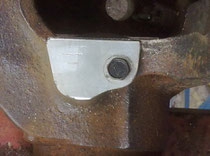
I would need a standard servo and master cylinder, so a quick search on Ebay and I soon had one on the way. In the mean time, I dare say the sensor hole on the hubs wouldn’t go down well with IVA, so I cut and made some plates to cover them. I secured them with the old sensor bolts, cut down, and some Hermatite instant gasket. When it was painted you’d never know it was any other, time would tell.
The build manual is quite detailed as far as the Beauford parts, but
really needs re-writing for the mechanicals. It was written for a Cortina donor car and although there is a section on stripping the Sierra, it assumes you have the knowledge to know the
difference when assembling because it doesn't.
Bump Stops - The manual says to be careful when tightening the self tapping bolts, there weren't any, they were rivnuts and without putting any pressure they pulled through. I tried several solutions that did not work my final one that did was to fill the cavity with Isopon then when it had almost set (firm but not completely gone off) I drilled and thredded the original bolt into it and left it to harden. It seems to have done the trick, I must remember not to try any "Dukes of Hazzard" jumps!
Engine Mountings - The
kit was supplied with replacement fabricated engine mountings to suit my 2lt DOHC. The standard mountings put the engine too close to the steering shaft and the alternater fouls it. The ones
supplied with the kit were slightly out of alignment and wouldn't bolt in
place. I had to slightly enlarge the holes before I could get them in (both sides). They were drilled for the rubber and also for the pin to stop them swivelling, but I couldn't get them to fit
into the chassis, I had to modify them again.
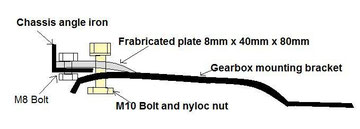
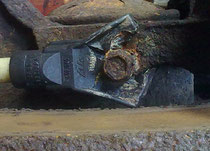
Gearbox mounting bracket - The manual says bolt to the angle iron in the chassis, but either my bracket is too narrow or the angle iron is too far apart! I've bought some 8mm thick mild steel bar from B&Q (thinner would probably be adequate), heated, bent and shaped it, then cut it into appropriate plates, to clamp the bracket to the rail. If I could weld, I would weld the plate to the chassis, but it should be ok. There can be no sideways movement because the bolts are against the chassis, longitudinal movement would be restricted by the engine mounts. That's my reasoning anyway, but I managed to get a slightly smaller bolt in to secure it instead of welding.
Heater modification - The heater is normally in two parts with the blower motor under the bonnet and the heater under the dash. The two units don't actually fit together, so I started working out how make mould a plate out of fibre glass that would do the job, shaping it around some plywood etc. In the end I just cut the ply out, shaped it, varnished it and bolted it together with frame sealant on the joints (the normal sponge seal was perished). It does the trick. I've just got to fabricate some brackets to mount it in the car now.
Wiring Loom - I had purchased a new generic wiring loom details of how I fitted it can be found on the electrics page. Talking to various people the most common solution seems to be to throw out the engine management system and the fuel injection system and replace with a standard loom and carburettor. I didn't and it caused a real headache at the time, but I'm glad I did it now.
W