 Colin's Beauford Project
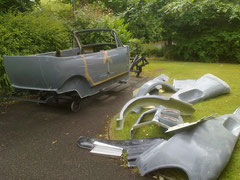
It Begins
The next challenge was to prepare the parts for the kit build. I started by stripping down the back axle and checking it out. I cleaned all the loose rust off the swing arms, brake shield etc. and gave it a couple of coats of black hammerite. The wheel bearings appeared sound, I needed to replace rubber boots on the halfshafts though and the front top mounting bushes. The brakes were ok, but cleaned and painted the callipers with red hammerite, replaced the seals and fitted new brake pads. The flexible pipes were new and the although metal pipes were sound I replaced them with new copper. I bought a flaring tool off Ebay to make my own, fortunately I had used one before because there were no instructions with it! The shock absorbers were passable, but I replaced them anyway. It all looked pretty good by the time I had finished. Just needed a kit to hang it on.
The kit having arrived on the Saturday was duly stored. I started on the Monday by having a good look at it and trying to work out which bit goes where. See problems page.
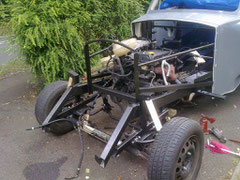
Anyway, I decided my usual approach of procrastination would not help and as the back axle was cluttering the garage I fitted it. It took
me six hours to fit the bump stops and three to fit the axle assembly, it all went together relatively easily.
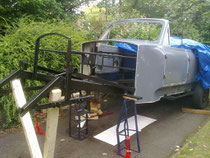
The next decision was to look at it sensibly. I'd made a start and could at least walk around my garage, but the chassis needed painting
before I really went any further. After bribing my wife she agreed to help, she started at one end and me the other, a tin of hammerite black each and we managed to paint all the accessible
surface of chassis. The next day, I jacked the the front of the kit up and using my ramps, on end (don't try this at home children), supported the chassis at a workable height and painted the
areas we had missed or couldn't get to.
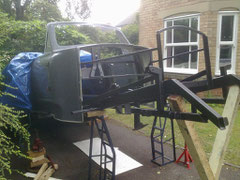
As I was going to be underneath, for addition support I braced the chassis with battens of wood. While it was up in the air, I thought I would take the opportunity to put the engine and gearbox in place under the car. The engine and gear box had been sitting in garage since removing from the donor car. I had made a little trolley for the engine and dismantled the beam, stub axles anti-roll bar and brakes for cleaning and painting.
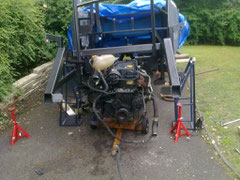
At this point I don't intend doing anything with the engine so I cleaned it down, then wheeled it between the ramp having removed the
battens of wood. The manual suggests this as a method of installing the engine or at least lifting the chassis over the engine, but they construct it from 3mm guage box section now and its not
lift-able, at least not by me! Anyway it worked.

I then spent the next hour lowering it down by stages, until I could install the engine mounts and secure to the car. I've still got the gear box mounts to drill and secure, but I thought I'd leave that for another day.
I started to pack up, then thought I might as well put the front beam in place and got carried away.
The front wishbone and stub axles I had already cleaned, prepared, painted and part assembled, so they went on next. The anti-roll bar (wasted 30 minutes searching for one of the cup washers, for some reason I hadn't put it with the rest), new brake discs (the old ones were badly corroded) and refurbished, painted calipers went on next.
The tie rod ends were sound, but when I took them apart the split pins were completely corroded and disintegrated, so after I removed the castle nut there was no hole to fit new ones. I thought about drilling them out, but for the sake of £20 I thought it wiser to replace with new.

The coil over shocks had not come in time to be delivered with the kit, so I cut two lengths of wood, about 13" long, drilled them for the bolts and the car is now standing on its own four wheels. All the bolts need tightening but I'm pleased with the days work!
I'm making progress.
The next step was tightening most of the front suspension bolts. The anti-roll bar concerned me slightly because the bolts that came with the kit were slightly smaller than the ones that came of the donor car so I used the original bolts with new nyloc nuts and large washers. The instructions for fitting the front beam said to use the original bolts but the thread did not extend far enough to tighten properly, so after a trip to Scewfix I replaced them with suitable bolts.
I was determined to get the brakes completed, so ordered a brake flaring tool and copper brake pipe from Ebay, but the flaring tool did not have any instructions with it. Fortunately I'd used one before or it could have been potentially dangerous or waste of money!